|
 |
| 07-15-2015, 07:39 PM | #1 |
|
Second Lieutenant
 61
Rep 280
Posts |
Railectomy
 Sorry for the craptastic pic. Best I could do with my phone and low lighting. A real photo shoot is in order soon. Anyway, yeah, I had the dealer do this for me at a significant discount as part of my purchase agreement. It's a tedious, PITA job but not especially difficult. I will never need the rails on this car - we have a Forester for stuff like that. They're now tucked away in the basement should that ever change. I'm very happy with the look. This car now has everything except lowness, which will have to wait until next year. Drop it an inch or two and I think it would be perfect. |
| 07-15-2015, 08:31 PM | #3 |
|
Second Lieutenant
61
Rep 280
Posts |
18x8 ET32, nearly identical to stock. Only thing I don't like is that the spokes bow out about 1mm. I was hoping for more dish, but whatever. They're light and well-made, and the gunmetal looks great with VO.
Oh, and one other thing: the rails are much lighter than I expected. Maybe not even 10 pounds each. So weight reduction from this is really insignificant. Last edited by improvius; 07-15-2015 at 08:42 PM.. |
|
Appreciate
0
|
| 07-17-2015, 04:52 PM | #4 |
|
Freude am Fahren

108
Rep 278
Posts |
Can you provide us with a complete parts order list to perform the railectomy? I want to do this to mine as well.
__________________
 Current: 18 X3 xDrive30i Past: 03 530i Sport | 06 330ci ZHP | 14 X1 xDrive35i M-Sport | 11 328i M-Sport | 98 M Roadster |
|
Appreciate
1
darkrom212.50 |
| 07-20-2015, 09:54 AM | #6 | |
|
niner
16
Rep 148
Posts |
Looks Awesome
 Quote:
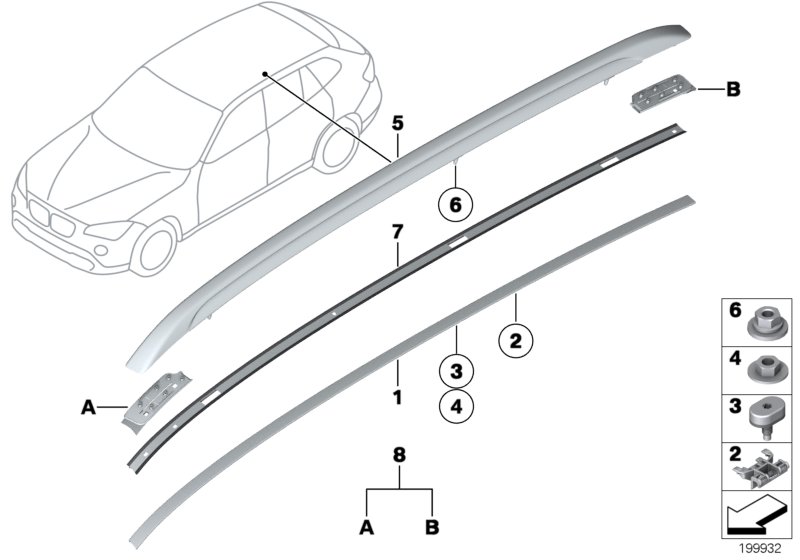 01 Roof molding left 1 51132990857 01 Roof molding right 1 51132990858 02 Clip 8 51132992450 03 Screw 6 07147174961 04 Hex nut with plate M6 6 07147155614 Let us know. Im about to do this also. |
|
|
Appreciate
0
|
| 07-21-2015, 09:52 PM | #7 |
|
Second Lieutenant
61
Rep 280
Posts |
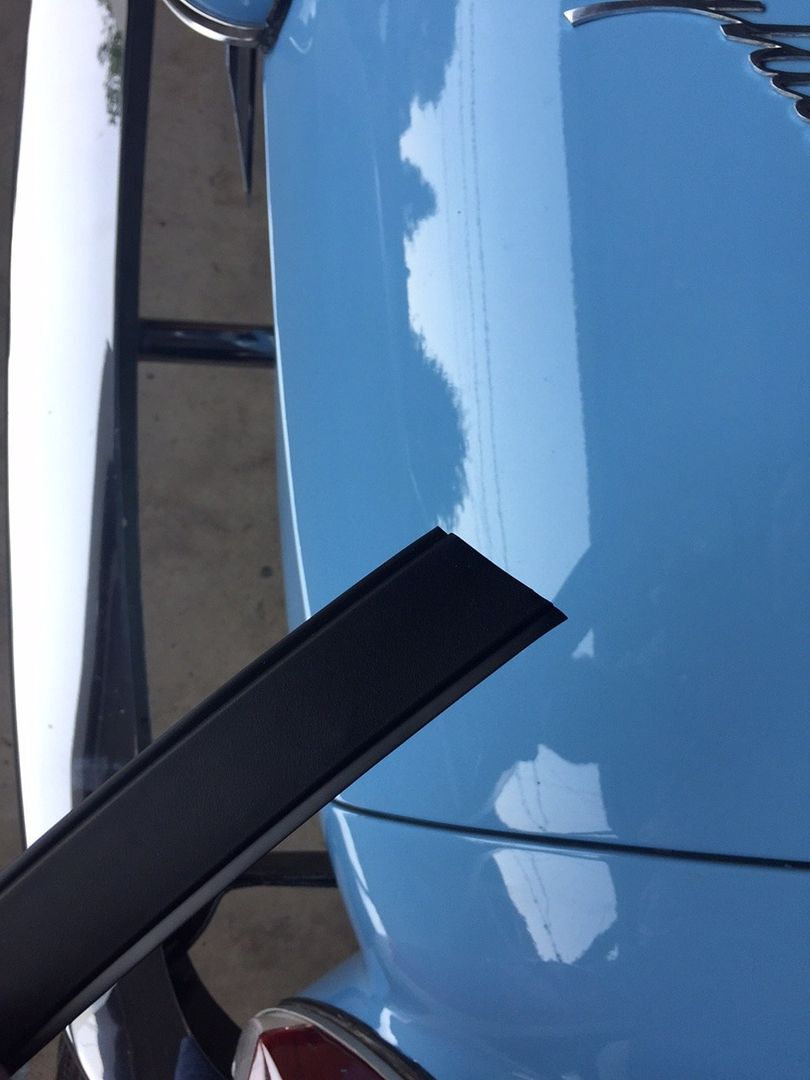
Here are some close-ups. Honestly, I think trying to color-match would maybe not look so good. I'm perfectly happy with the black on orange look.
Overall, the fit is good. The front tip does warp slightly up on the outside edge of the trim strip. It's a little more pronounced on the passenger side, as you can see in the last pic. No complaints other than that. The tail end is nice and flush. As for parts, I emailed the dealership earlier, but haven't heard back yet. I'll relay that whenever I find out.     |
|
Appreciate
1
|
| 08-20-2015, 03:38 PM | #8 |
|
niner
16
Rep 148
Posts |
ALL X1s come with holes drilled FYI. The screw and the hex nut above seal the hole.
Parts finally arrived. Ordered from ECS. Looks like the molding already has the clips so you don't need the clips. The molding and the seal part are one piece. The molding is aluminum or some soft metal so you could fix this gap if you wanted by taking it off and forming it down a bit. I'm not sure when I will install since I bought a different fun car to work on...the BMW was getting pricey.hahha I'll update when I can. |
|
Appreciate
0
|
| 08-20-2015, 04:54 PM | #9 |
|
Second Lieutenant
61
Rep 280
Posts |
Cool. Should I just be able to pull it up at the front then?
EDIT: could you post up a quick pic of the bottom of the trim pieces so I know what i'm pulling up? Last edited by improvius; 08-20-2015 at 05:15 PM.. |
|
Appreciate
0
|
| 08-21-2015, 11:06 AM | #10 |
|
niner
16
Rep 148
Posts |
 Just realized thats the top. Ill get you a pick of the bottom. Yeah I think you just pull up from the rear of the car first. Dont go too fast or you will bend the molding and need to fix that as well. I would use a plastic pry tool. If you break some clips let me know I have extras and would be happy to send you a couple. I dont think they will break. |
|
Appreciate
0
|
| 08-21-2015, 11:11 AM | #11 |
|
Second Lieutenant
61
Rep 280
Posts |
Thanks, just want to get an idea for where the clips are.
I'll probably try pulling one up tonight or tomorrow, will let you know what they used to plug the holes. EDIT: Nevermind, it pops on and off pretty easily. Holes are nicely filled with some sort of bolts + rubber washers. Will post pics later. Last edited by improvius; 08-21-2015 at 04:56 PM.. |
|
Appreciate
0
|
| 08-22-2015, 06:59 AM | #12 |
|
Second Lieutenant
61
Rep 280
Posts |
Here's the "plugged" hole. I assume this is #3 from the previous diagram.
 UPDATE: I manged to bend it into a better fit. It is not especially easy to bend. The material is pliable, but the structural bending on the sides makes it very rigid. I mistakenly tried using pliers and a towel first, but that did more harm than good. If yours is off like mine, I suggest just taking the time to carefully bend with your hands. Last edited by improvius; 08-22-2015 at 08:20 AM.. |
|
Appreciate
0
|
| 11-09-2015, 11:31 AM | #14 |
|
niner
16
Rep 148
Posts |
its kind of a pain in the ass. I started and decided not to. didn't have the time really.
Remove the headliner/grab handle brackets. You can use WEBISTA for instructions but its not very clear. I have all the parts, maybe I will just sell them if you are interested. |
|
Appreciate
0
|
| 11-09-2015, 11:59 AM | #15 | |
|
Second Lieutenant
61
Rep 280
Posts |
Quote:
 Sorry to hear it. I was wondering why you hadn't posted pics yet. Sorry to hear it. I was wondering why you hadn't posted pics yet. |
|
|
Appreciate
0
|
Post Reply |
| Bookmarks |
|
|