 |
 |
| 05-01-2013, 11:22 AM | #23 | |
|
Private First Class
 5
Rep 109
Posts |
Quote:
1/4" ratchet, 8mm socket, phillips head bit, t-25 bit, rigid 12v drill with 1/8" drill bit, center punch, painters tape, and time (40 mins per side) be sure to clean the areas the tape will mount to very well. i used a mix of ~15 oz isopropyl alcohol to a gallon of water. on the 2013 model you need to drill out the center of one of the push pin clips that hold the trim part in place on the front (and the rear) along with drilling two 3mm (1/8" drill bit) holes for the two lower mounting holes for the fronts step7-8. this can be done with the wheels on the car but will require a helper holding the steering wheel (with the engine runing) left and or right to drill the inner most mounting holes. you may want to appy some painters tape to the wheel rim fir added protection when fastening the two inside screws as the steering wheel is being held, you dont want to touch the rim with anything metal, period. find a center punch for fasterner "C". it will take some force to push it home. be sure to line up the little indention on the front mud flaps before drilling any holes. (the picture in step 6 of the posted PDF front mud flap install does not show the indetation) do not pull the red tape off of the 3M mounting tape until you are assured of the proper alignment for the hole you are about to drill. the right rear mud flap is a piece of cake to install. all holes matched up perfectly. the left mud flap rear requires a single hole to be drilled in the wheel well for steps 5-6. not too much room but it can be done with a small drill. |
|
|
Appreciate
0
|
| 05-21-2013, 08:33 PM | #24 |
|
Private First Class
14
Rep 148
Posts |
I installed mine tonight. It went pretty well although I did get the left front about an 1/8" low, the indentation does not match perfectly. I will probably be the only one to ever notice.
|
|
Appreciate
0
|
| 08-01-2013, 08:12 PM | #25 |
|
Second Lieutenant
 16
Rep 206
Posts |
Just thought I'd bump this and see how everyone is liking the mud flaps. After driving my car home from the dealer (250 miles) the rain and dirt on the road _really_ made the driver and passenger doors dirty, but most of the rest of the car looked fine. Lots of dirt lines that radiate up from the wheels, including on the back wheels but not as bad (though I have wider rear tires with the summer wheel package).
Also, anyone know if the 2014 models require drilling like the 2013? |
|
Appreciate
0
|
| 08-03-2013, 06:17 AM | #28 |
|
New Member
0
Rep 7
Posts |
Mine was installed by dealer. Lower parts of doors and back still gets dirty; maybe less than without them? But I like the look - they finish the car off nicely.
|
|
Appreciate
0
|
| 08-05-2013, 04:05 PM | #29 |
|
Second Lieutenant
16
Rep 206
Posts |
Are they a hard plastic? I'm wondering what might happen if you went over a rock, curb, or something that could be short enough for the body but higher than the bottom of the mud flap. The X1 appears like it might be able to go over a curb fine, but I wonder if adding the mud flap would cause major damage if you tried it with them on.
|
|
Appreciate
0
|
| 08-05-2013, 04:26 PM | #30 |
|
Enlisted Member
 2
Rep 44
Posts |
will the mudflap on the X1 make the car looks lower?
__________________
Black Metallic - xLine - Moonroof - Steptronic - Navigation Professional - Xenon - and more! -
|
|
Appreciate
0
|
| 08-09-2013, 01:38 PM | #32 |
|
Registered
0
Rep 1
Posts |
I went ahead and bought the mud flaps and planned on installing them myself... and then I notice that for the M Sport there is no side molding to attach to. Should I attach them on the inside/bottom and call it good? I'm afraid it might look bad and/or damage the paint. I'm in the Pacific NW, so I'll be facing lots of rain this coming winter.
P.S. My first post! Last edited by pdx_1; 08-13-2013 at 05:14 PM.. |
|
Appreciate
0
|
| 11-07-2014, 12:56 PM | #33 | |
|
Registered
0
Rep 1
Posts |
Quote:
|
|
|
Appreciate
0
|
| 11-11-2014, 02:36 PM | #35 | |
|
First Lieutenant

28
Rep 330
Posts |
Quote:
BMW wanted to charge me AUD$50 each to install. What a rip off, I saved $200 by easily doing it myself. |
|
|
Appreciate
0
|
| 11-11-2014, 04:21 PM | #36 |
|
Enlisted Member

2
Rep 35
Posts
Drives: 2014 X1 xDrive35i, 2001 540iA
Join Date: Jul 2013
Location: SF Bay Area (East Bay)
|
Can anyone explain why the mudflaps aren't compatible with MSport models and has anyone had success installing mudflaps on an MSport?
|
|
Appreciate
0
|
| 11-12-2014, 04:13 AM | #37 | ||
|
Lieutenant
274
Rep 582
Posts |
Quote:
Quote:
Here is my post on doing the install: http://e84.xbimmers.com/forums/showp...12&postcount=7 Last edited by BeEmVe; 11-12-2014 at 04:20 AM.. |
||
|
Appreciate
0
|
| 11-13-2014, 11:47 PM | #38 |
|
Let's save military ranks for those who earn it!

45
Rep 1,161
Posts
Drives: ...on the Ragged Edge
Join Date: Dec 2008
Location: Edmonton, AB, Canada
|
Do you have photos?
__________________
Richard
2013 BMW M3 Individual -- Fire Orange (sold) 2013 BMW X1 xDrive35i M-Sport -- Valencia Orange (sold) 2011 BMW 1-series M Coupe (#205/220) -- Valencia Orange (sold) 2009 BMW 135i M-Sport Coupe -- Space Grey (sold) |
|
Appreciate
0
|
| 11-14-2014, 03:49 PM | #39 | |
|
First Lieutenant
36
Rep 372
Posts |
Quote:
You were right about that bottom large/long retainer that requires a punch--very odd setup. Unfortunately, my punch managed to go through the tip as I was tapping it in with a hammer! I had to remove it, after which, I replaced it with the original. the original is somewhat threaded but I could not get it to snug up--not even sure if there are threads in the hole side at all. Just kept spinning. I will have to look for some replacement if that original plastic bolt manages it's way out. All-in-all, very pleased with the mud flaps. |
|
|
Appreciate
0
|
| 11-15-2014, 12:06 PM | #40 | |
|
Lieutenant
274
Rep 582
Posts |
Quote:
|
|
|
Appreciate
0
|
| 11-15-2014, 07:19 PM | #41 |
|
Let's save military ranks for those who earn it!
45
Rep 1,161
Posts
Drives: ...on the Ragged Edge
Join Date: Dec 2008
Location: Edmonton, AB, Canada
|
Photos please MishMosh.
__________________
Richard
2013 BMW M3 Individual -- Fire Orange (sold) 2013 BMW X1 xDrive35i M-Sport -- Valencia Orange (sold) 2011 BMW 1-series M Coupe (#205/220) -- Valencia Orange (sold) 2009 BMW 135i M-Sport Coupe -- Space Grey (sold) |
|
Appreciate
0
|
| 11-16-2014, 09:38 AM | #42 | |
|
First Lieutenant
36
Rep 372
Posts |
Quote:
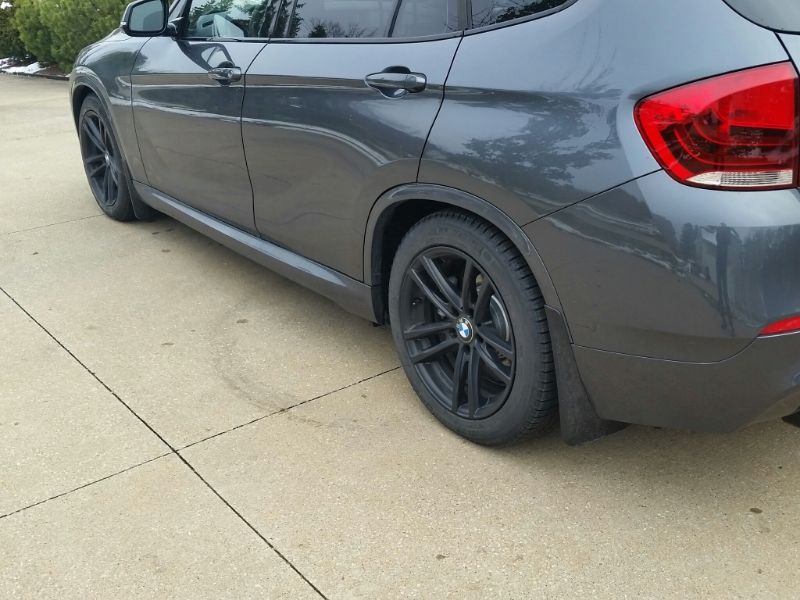 Front: 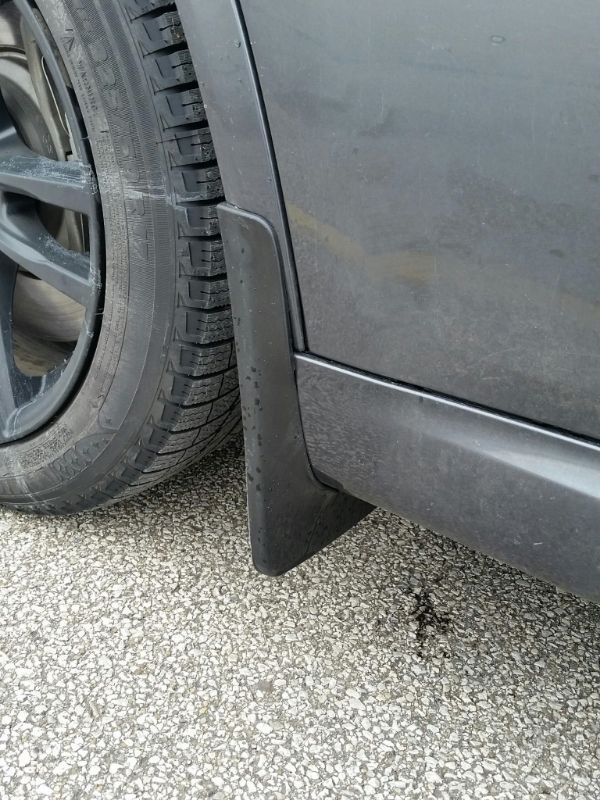 Rear: 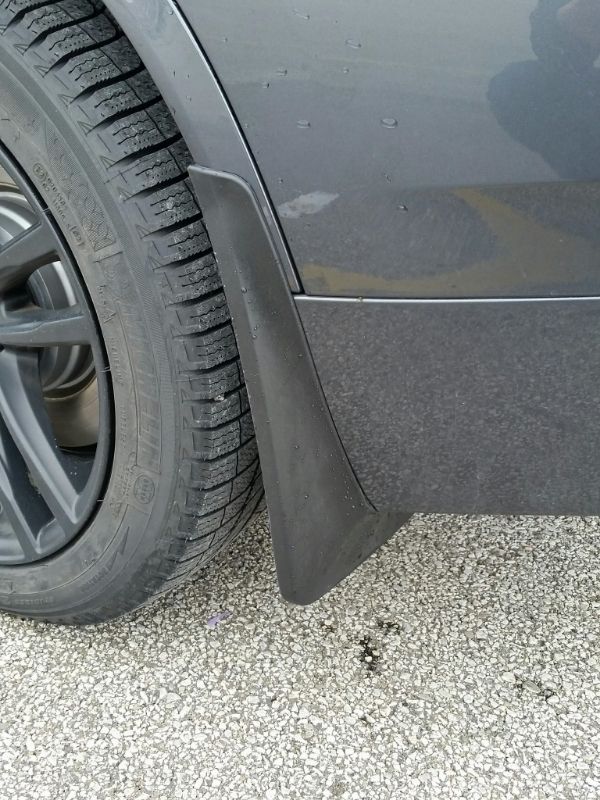 Note: some of the gap near the bottoms can be reduced with a little heat gun application. Just don't melt it. |
|
|
Appreciate
0
|
| 11-16-2014, 11:58 AM | #43 |
|
Let's save military ranks for those who earn it!
45
Rep 1,161
Posts
Drives: ...on the Ragged Edge
Join Date: Dec 2008
Location: Edmonton, AB, Canada
|
Thanks. They look great on there actually. Must order for mine then.
__________________
Richard
2013 BMW M3 Individual -- Fire Orange (sold) 2013 BMW X1 xDrive35i M-Sport -- Valencia Orange (sold) 2011 BMW 1-series M Coupe (#205/220) -- Valencia Orange (sold) 2009 BMW 135i M-Sport Coupe -- Space Grey (sold) |
|
Appreciate
0
|
| 11-16-2014, 01:58 PM | #44 |
|
First Lieutenant
36
Rep 372
Posts |
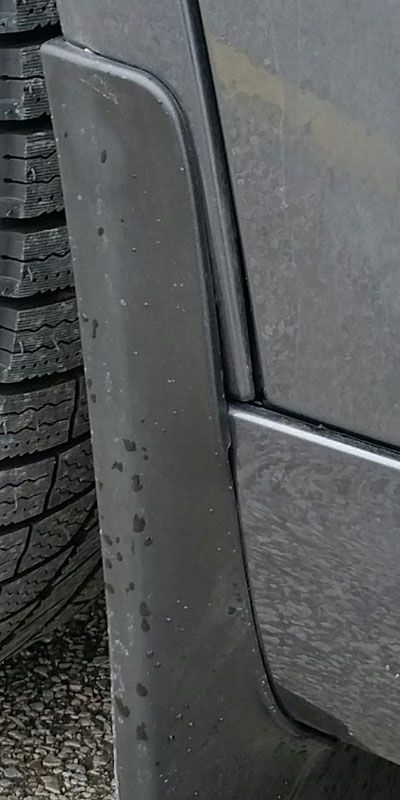
I definitely think the car looks better with the mudflaps. Here's a close up of the fronts where the outside edge does not match the side moulding of the M-sport. You could trim that middle portion some but I didnt' want it to looked "hacked" and actually make it look worse.
 |
|
Appreciate
0
|
Post Reply |
| Bookmarks |
|
|


