Completed my installation of Bilstein B6 Shocks / Struts with H&R springs. Some tips that I'd like to contribute while this installation is fresh in my mind.
All together, you're looking at about 8-9 hours of labor if you plan on tackling this job by yourself and it's your first time. If you have a buddy helping and tackle two sides at once, you can probably shave a couple hours off. I called two local shops before I took it on and they both quoted me $99 an hour, multiplied by what their systems showed as a 7-8 hour job. Plus $79 for alignment. One guy's actual response was, "Woah. That must be one hell of a job." I'd obviously rather spend the weekend with my wife and kid instead of working on my car, but at that price, there was no way I was paying to have someone else do it. I've lowered about a dozen (Mostly Japanese) vehicles in my life. On a difficultly level of 1-10, I'm giving this an solid 8 or 8.5 based on my prior experiences.
1. If you are going to cut your bump stops and own a Fein (or harbor freight equivalent) Oscillating tool, you're in luck. The wood cutting bit works perfectly. Was able to cut a perfectly square section out of all four stops with no effort.
2. Familiarize yourself with the central jacking points on your vehicle. There is one in the middle in the rear and one in the middle in the front. They were designed to lift half of your vehicle at a time.
3. Rears are very straight forward. Took me 2.5 hours, but I was completely dilly-dallying. Could shave an hour off of that now that I know the jacking points and how to remove the interior trim pieces. In the rear, I trimmed off just the lowest "Bump" of my factory bump stop. This allows you to reuse your factory dust boot because it also fits over the second "Bump" as well with a little bit of wiggling.
4. Fronts are a pain. Not going to lie. The link "D Unit" has posted above helped tremendously. It is about 95% accurate to our vehicles and is a perfect walk-through to follow along on. Passenger side is the hardest corner. That corner took me 4 hours, because I couldn't figure out for the life of me how to get the strut back in. Once I realized how to actually do it, it was smooth sailing. Driver's side took exactly 2 hours.
5. Put duct tape on your wheel well trim and part of your fender to protect it from scratches as you are wrestling components. I put like 4 or 5 layers and believe me, they were needed on the passenger front. I nicked almost all the way through the tape with one of the studs on the top of the strut assembly
6. If you are cutting your internal bump stops on your front struts, remember to put a couple dots of blue locktite on the threads of the bottom nut during reassembly so that it cannot vibrate back off. I cut mine in half, precisely at the narrowest portion in the middle of the seam where it tapers inward, then cut the lower portion perfectly in half. I discarded the middle section. Stacked the top part on top of the lower part and there was about an 1" or so removed.
7. When removing and reinstalling the front, be sure to turn your steering wheel. When you're working on the passenger side, turn the wheel all the way to the left. When working on the driver's side, turn the wheel all the way to the right. This allows you to tip the knuckle to give yourself a bit more play. It will be needed.
8. You don’t need to purchase a fancy knuckle spreader tool, but don’t try to use a pry bar as BAV Auto shows in their video either. (Their method is much more difficult than they're making it) For easiest and quickest method in spreading the knuckle, use a 3/8 to 1/4 socket adapter to pry open the knuckle. Works perfectly. Insert the ¼ side into the slot in the back of your knuckle. Give it a couple taps with a hammer to make sure it’s in all the way. Then rotate it 1/8 of a turn with your 3/8 inch rachet. This will open the knuckle up perfectly with plenty of room to remove the old strut and install the new one. I’ve done this in the past with VW’s and it has never failed me. Works perfect in this application as well. I didn't damage mine at all in this process, but you may want to purchase a donor from Harbor Freight to use for this job.

9. Place 2x4's underneath the rotor on in the front before you remove the three 13mm nuts that hold the strut to the strut tower. This is going to catch your suspension from crashing towards the ground when the last nut is removed. I didn't do this on the passenger side and was amazed at how quickly and far the entire assembly dropped to the floor. Instantly popped the CV shaft out of socket the moment it fell.
10. You will not be reusing the BMW front bump stop or dust boot since Bilstein has an internal bump stop and includes it's own dust boot. No one has mentioned this in the past, so I'm just stating the obvious.
11. To remove the front struts, loosen everything as indicated in the BAV auto video. You should be able to wiggle the strut directly upward and out of the dropped knuckle while applying downward pressure to the knuckle. Worse case scenario, you may have to use spring compressors on a couple coils of the original springs in order to gain enough clearance. I really think you can get by without doing this though if you have an extra set of hands or use your feet to push downward while you wiggle upward. BAV auto shows the assembly tipping outward and then pulling out of the knuckle. I wouldn’t recommend that approach. Not nearly as easy in our cars. I wasted 2 hours trying to remove and reinstall by tipping the assembly out of the wheel well instead of simply removing the strut from the knuckle vertically while inside the wheel well.
12. I am 100% convinced that it is NOT POSSIBLE to NOT pop the CV shaft out of socket on the passenger side. In other words, just prepare to experience this. I popped it out at least a dozen times while learning the correct approach. If you do pop the CV shaft out of socket (Much easier to do on the passenger side) don't worry about it at all. Not a big deal. Don't bang it into position. Just simply lift the lower knuckle assembly a little with your hands to generally line up the shaft and gently wiggle your rotor side to side until it works it's way back into socket. Not a big deal at all. Extremely easy to get back into socket. Believe me. You know when it's in and you know when it's out. I did not rip my boot at all. Driver's CV Shaft did not pop out of socket one time for me.
13.
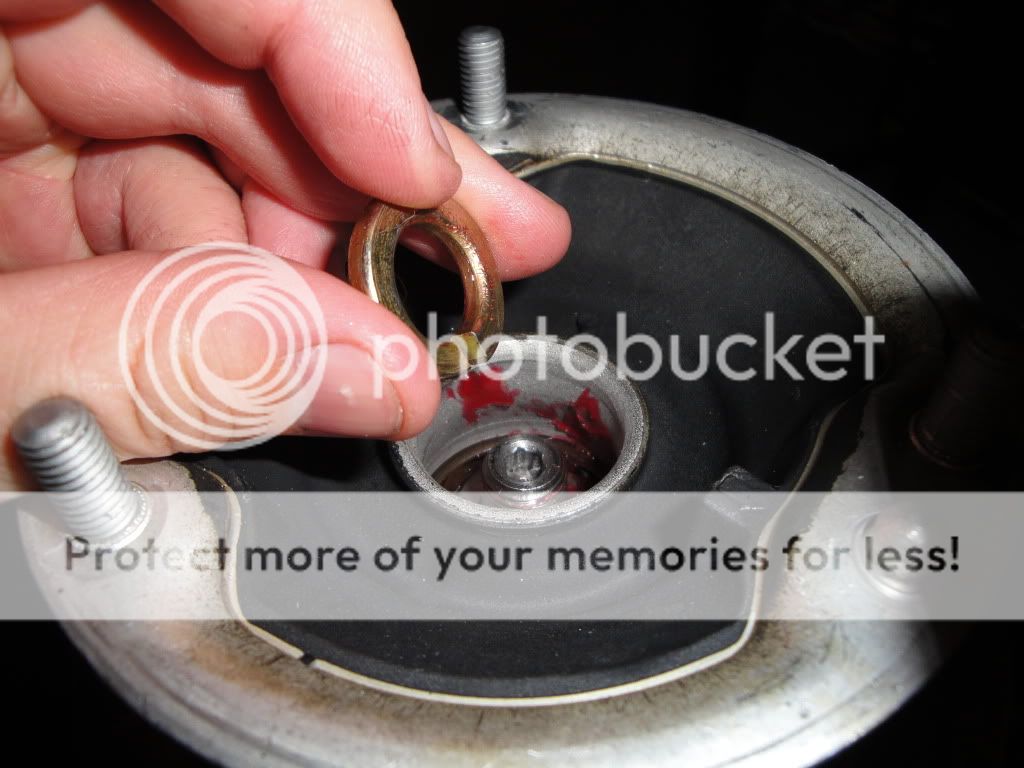
IMPORTANT: When you are assembling your new spring/strut assemblies, be sure to place a 1/2" Grade 8 lock washer under the nylon lock nut on top of each of the front strut assemblies. I battled an 18 month "POP" after installing my B6s with H&R springs once they settled. Eventually found that the B6 front struts have an unthreaded portion at the top of the strut that will not allow the nut to tighten down far enough if you are using a spring that is shorter than stock. You'll "Think" it's torque properly, but basically what's happening is you are simply running out of thread and are hitting the unthreaded portion of rod. The thickness of this 1/2" Lock washer will fill up that extra unthreaded portion to absorb the slack. Here's a photo to show what I am talking about. If you don't install this extra lock washer, you're taking a great chance that once things settle, you're going to have an 1/8" of slack in your assembly that cannot be tightened down, which will cause an annoying "POP" that you can not only hear, but also feel everytime you stop, go and travel over small bumps.
14. To reinstall the new strut assembly, bolt it up top to the strut tower first with all three 13 mm nuts. Tighten them loosely. Now use your jack to lift the knuckle up and onto the strut. This way you can be sure your CV shaft is properly in place. Very easy to do with the shortened strut assembly.
15. While you've got your jack holding the knuckle upward, this would be a great time to also tighten your control arms. This will eliminate unnecessary pre-load (twist) on your bushings. You will know you're at a good estimated ride height based on whether or not your sway bar link will bolt back to its hole perfectly straight or not. Especially if the opposite side of the car has it's wheel sitting on the ground or on boards. If it does, the sway bar already has tension and it's position would be a great indicator.
16. Have fun. Don't get yourself too worked up. Enjoy some frosty beverages as you go. If you're anything like me and have a pretty busy home life, I'd plan to do this over the course of maybe two or three days. I rode my bike to work for two days. Maybe the rear the first day to get your feet wet then tackle the front. Just keep in mind that the driver's side is a little easier than the passenger side (due to a shorter CV shaft I believe).
17. Your car is going to take weeks (if not months to fully settle). Go ahead and immediately get yourself an alignment. Won't hurt to have it done again in a year.
-Special thanks to PrematureApex, themishmosh and D Unit for assisting me personally.
EDIT:
MOST IMPORTANT TIP Holy crap, I cannot express how important this tip is. It will cost you hours if you make the mistake I originally did when I installed my new setup. When you disassemble your upper strut mounts for the front of the car, between the bearing and the spring perch there will be two oddly shaped (Conical) washers. There a big one on the bottom with a smaller one stacked on top. IT IS EXTREMELY IMPORTANT that you put these back into the car facing the exact direction that they were when you pulled them out. Seriously, listen to me. The reason I'm saying this is because I installed one of them upside down and after 2.5 weeks, had to tear the front suspension back out of the car due to a "POP" everytime I'd get into the car and turn the steering wheel to the left or the right. Luckily, I vaguely remembered the orientation in which I installed these washers. I looked them up online and determined that I had installed one of them upside down. The washers are meant to pivot against each other like this )( The smaller faces of each ride against each other so they can turn as you turn the steering wheel. This means the flat faces of the washers face away from each other. If you set them up any other way - For example, any of these orientations )), ((, (), they're going to grip each other when you turn the steering wheel and cause your bearing to not allow the top hat to rotate freely. This will cause the spring to bind when you turn the steering wheel. You're going to hear and feel a brief pop as the two washers grip and grind away at each other. It'll drive you nuts.
TLIDR: If the top of your strut mount doesn't spin side to side freely after you torque the strut nut, you most likely installed the washers improperly.
Here are some pictures of the washers and exact how they need to be reinstalled into the car:
View post on imgur.com